
Load contacts in bulk from a CSV file using the import wizard. You build a visual map of how each CSV column becomes a contact, an email, a phone number, an address, an attribute, or a relationship to another contact, then run the import.
Prerequisites
-
A CSV file with a header row. The header names are what you drag onto the map, so pick readable names (for example Full Name, Email, Company, Mobile).
-
A contact group to receive the imported contacts. Create one first if you don't have one. See Working with groups. Every import is saved into a group you choose.
Open the import wizard
-
Open the Contacts page.
-
Open the kebab menu in the top-right toolbar and click Imports. The wizard opens with 3 tabs: Map, Review, and Confirm. You can move between tabs while you set things up.
Step 1: Map your CSV
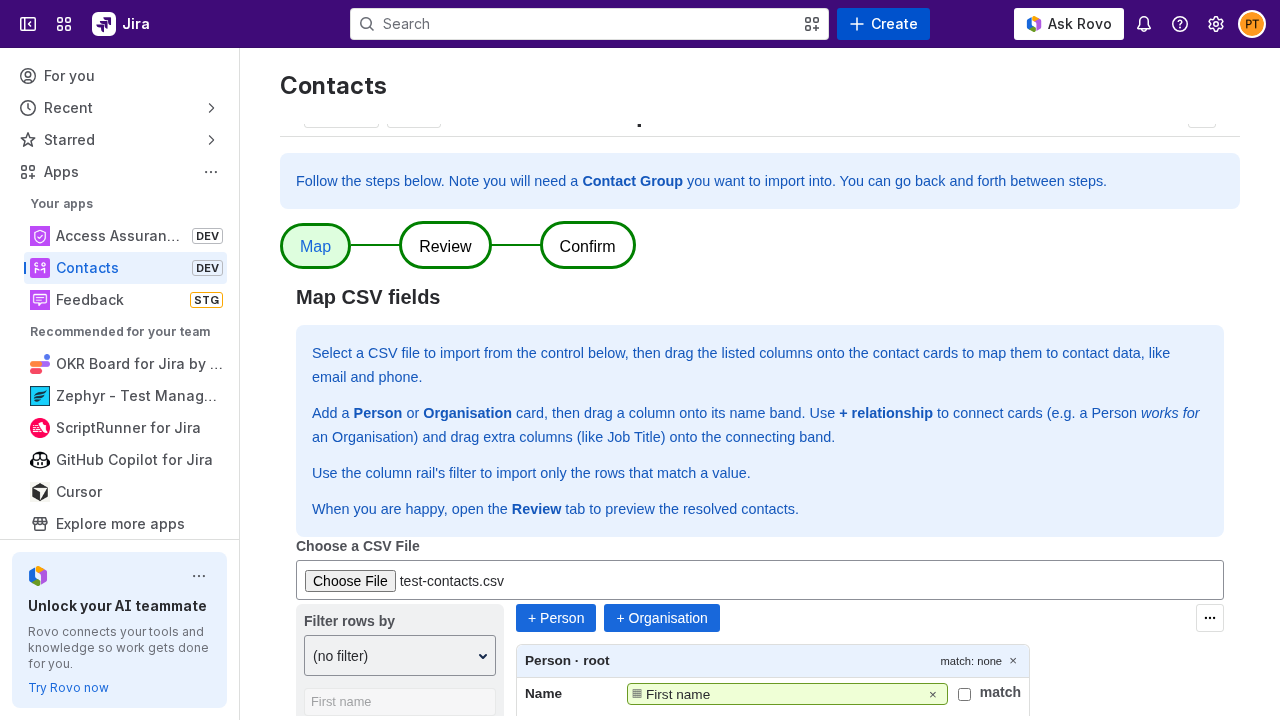
The Map tab is a canvas. On the left is a rail listing every column from your file. On the right you add cards for the things each row should create (a person, an organisation), then drag columns from the rail onto the fields of those cards.
-
Click Choose a CSV File and pick your file. The column rail fills with your headers, grouped by kind (names, organisation, email, phone, address, links).
-
Add a card. Click + Person or + Organisation. The first card you add is the root card, the main contact each row creates.
-
Map the name. Drag the column holding the contact's name from the rail onto the card's Name field. A mapped drop zone turns green and shows a column marker.
-
Add more fields. On the card, use + field for an email, phone, address, link, or comment, + attribute for a stored attribute (for example an external ID), and + relationship to link to another contact. Each one adds a row to the card.
-
Map each field by dragging the matching column onto its drop zone.
-
Set match and overwrite where you need them. See Matching and updating existing contacts.
-
Open the Review tab when the map looks right.
Card rows at a glance
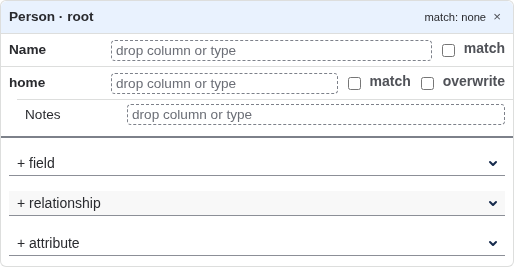
Each row on a card has a drop zone and, for fields, two checkboxes.
|
Control |
Purpose |
|---|---|
|
Drop zone |
Drag a column here, or click and type a fixed value. Green with a column marker means a column is mapped; a quote marker means a fixed value. |
|
match |
Tick to use this value to identify an existing contact. See Matching and updating existing contacts. |
|
overwrite |
Tick to replace an existing value on a matched contact instead of adding alongside it. |
Typing a fixed value instead of a column
Some information is carried by the column name rather than its data. For example a Manager column holds the manager's name, and you want the job title to read "Manager". Click a drop zone and start typing to enter a fixed value that applies to every row. A fixed value shows a quote marker; a mapped column shows a column marker. Drag a column onto the same drop zone to switch back to a column.
Relationships to other contacts
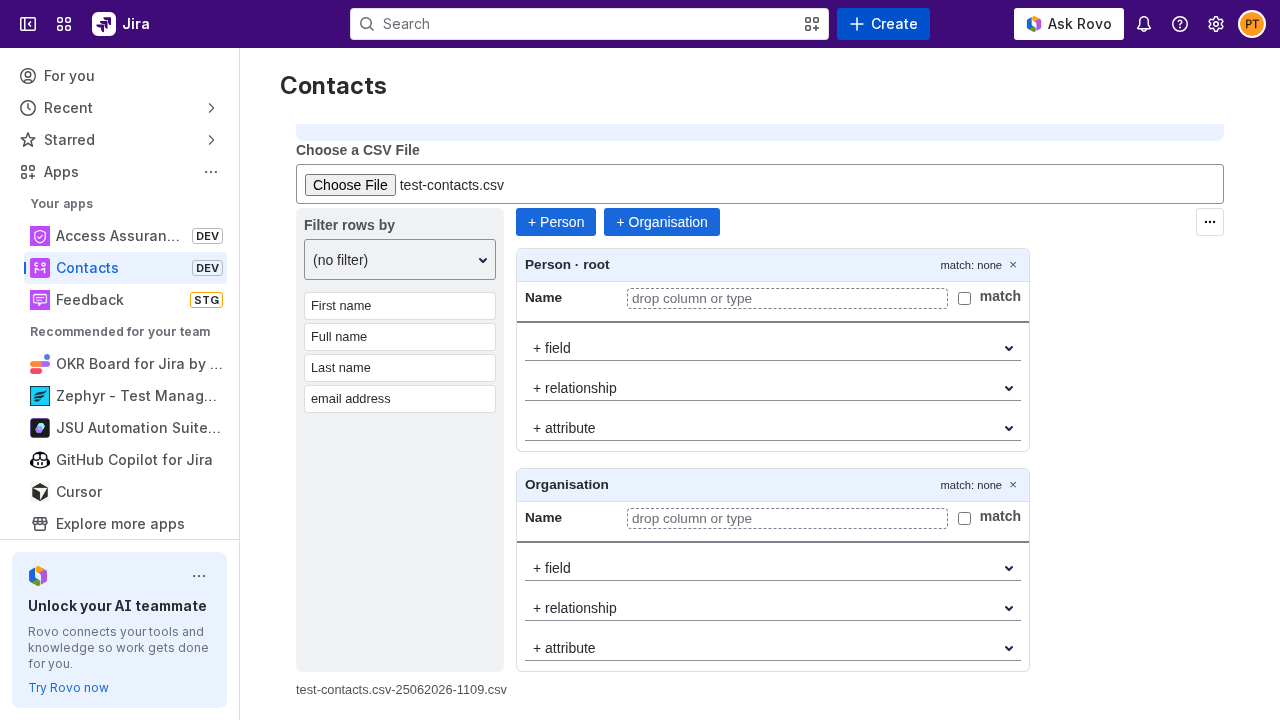
Use + relationship to connect a card to another contact, for example a person who works for an organisation. Adding a relationship does 2 things:
-
It adds a relationship band beside the card. Drag columns onto the band to fill relationship details, for example Job Title and Division on a works-for link.
-
It adds a related card for the contact at the other end. Map its name and fields the same way. A connecting line links the band to the related card.
Related contacts are matched against the contacts you can already see, and created if they don't exist. The related card's match fields decide what counts as the same contact.
Matching and updating existing contacts
By default every row creates new contacts. To update contacts you already have instead of duplicating them, tick match on the fields that identify a contact, for example an email or an external-ID attribute. When every ticked match field equals an existing visible contact, that contact is updated rather than created.
For each related field you can also tick overwrite:
-
overwrite off: the imported value is added alongside any existing values.
-
overwrite on: the imported value replaces the matching value, which keeps a single current value such as one work email.
Attributes are always overwritten on a matched contact.
Importing only some rows
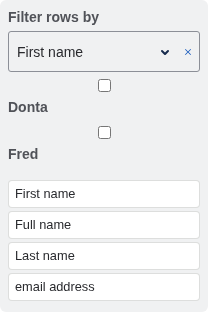
To import a subset of your file, use the Filter rows by control at the top of the column rail. Pick a column, then tick the values to include. Only rows whose value in that column is ticked are imported. This is how you import, for example, only the rows whose Type column is Organisation.
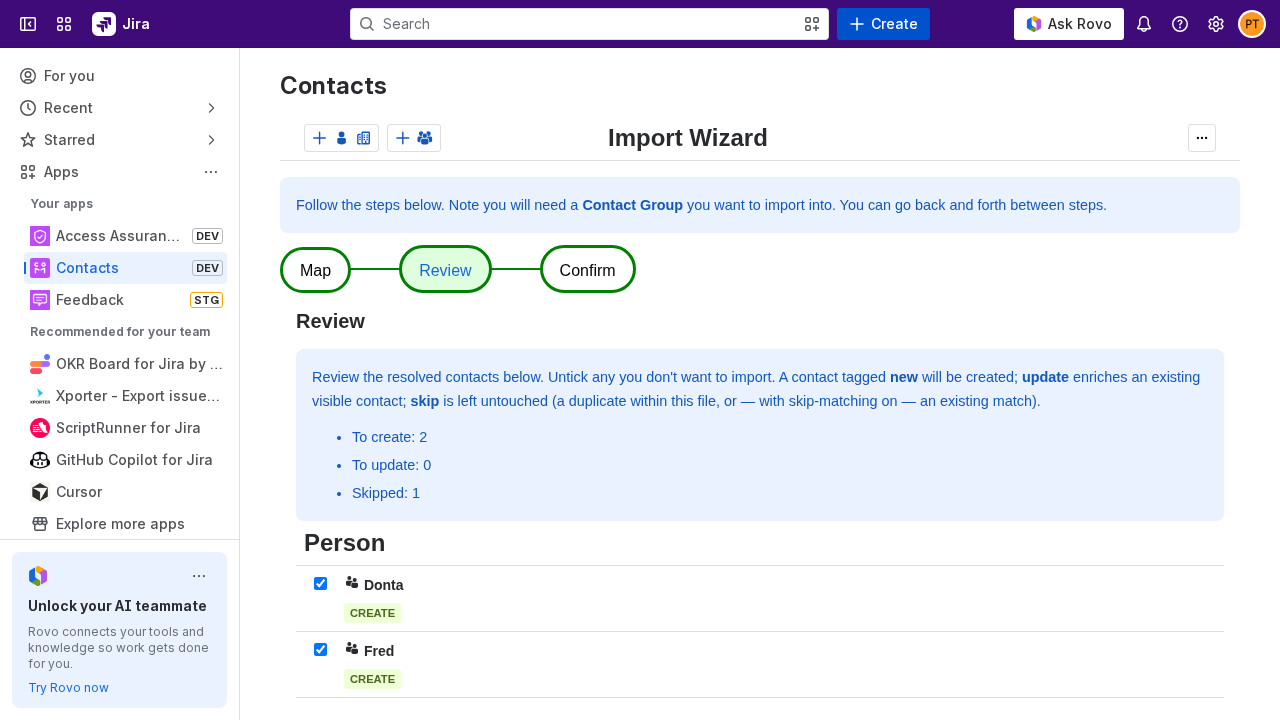
Step 2: Review
The Review tab shows what the import will do.
-
Read the counts at the top: how many contacts will be created, updated, and skipped. A skip is a duplicate within the file, or an existing contact left untouched when skip matching is on.
-
Check the resolved contacts listed by type below the counts, each tagged create, update, or skip. For a large file only the first contacts of each type are shown; the counts still cover the whole file.
-
Untick any contact you don't want to import.
-
Go back to Map to fix anything. The preview rebuilds each time you open the tab.
Step 3: Confirm and run the import
-
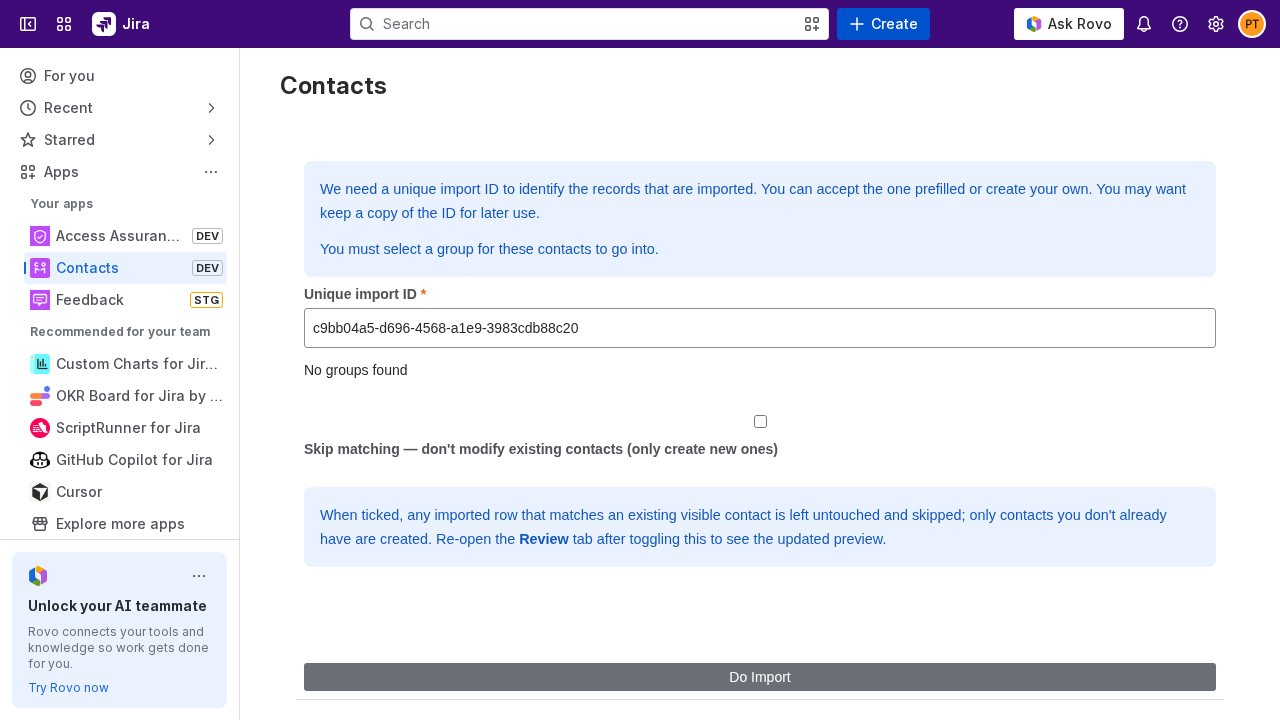
Check the Unique import ID. The wizard prefills one. Edit it if you want a memorable label, but keep it unique. Note it down if you want to find the batch later.
-
Pick a group from the Select a group to import into dropdown. Only groups you can write to appear here.
-
Set Skip matching if you want to protect existing contacts. With it on, any row that matches an existing contact is left untouched and only new contacts are created.
-
Click Do Import. The wizard creates and updates contacts in batches. When it finishes you're returned to the Contacts page.
Reusing a mapping
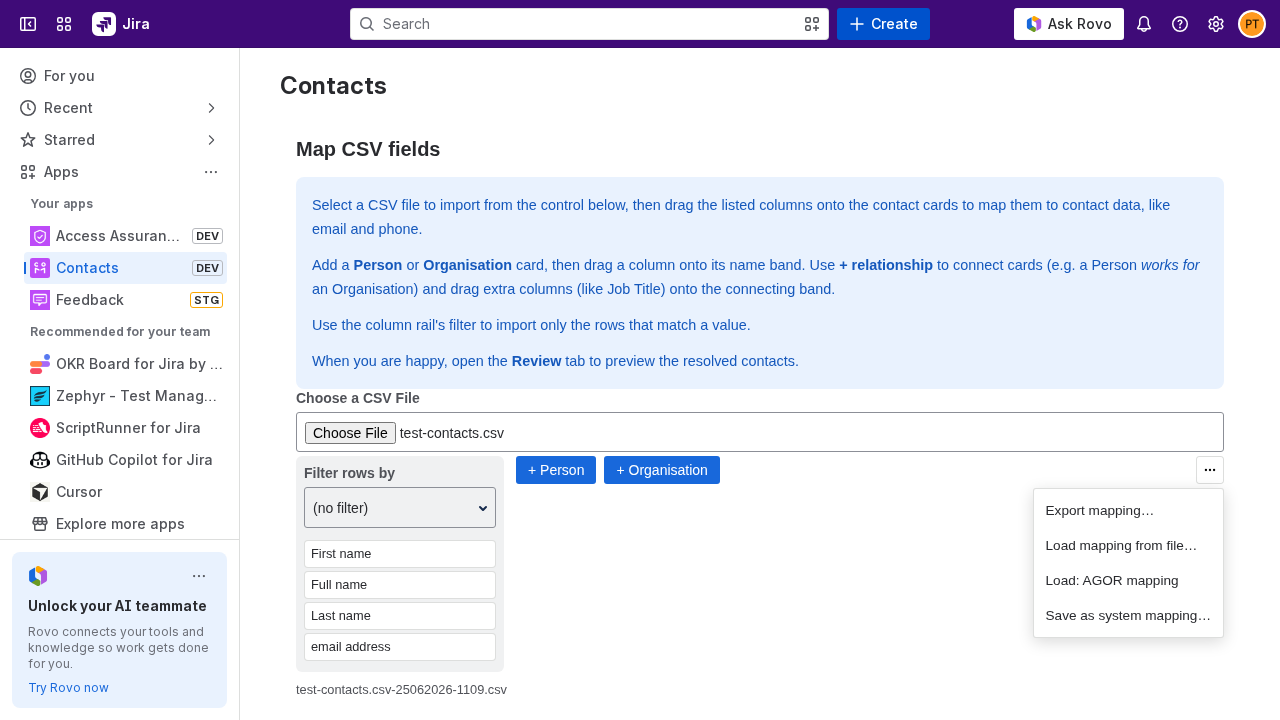
If you import the same file format often, save the map so you don't rebuild it each time. Open the kebab menu in the Map tab toolbar:
-
Export mapping downloads your current map as a JSON file you can keep and share.
-
Load mapping from file loads a map from a JSON file and applies it to the current CSV. Any columns the map expects but your file doesn't have are reported as unmapped.
-
Save as system mapping (admins only) saves the map for everyone on your site. It then appears in the same menu, labelled Load: followed by the name you gave it.
To hand a map to an admin, export it to a file and send them the file. They can load it and save it as a system mapping for the whole site.
Result
The imported contacts appear in your contact list, in the group you chose on Confirm, so anyone with access to that group can see them. Click a contact's name to open the contact details dialog and check the values landed in the right fields.
Next:
-
Working with groups: share the new contacts by adding the import group to an access group.
-
Linking contacts to work items: attach an imported contact to a Jira Work item.