
Togetha Contacts adds four actions to Jira automation rules: one that creates a contact from rule data, one that reads field values out of a contact, one that updates an existing contact, and one that finds or creates a contact from a Jira user or JSM organisation and sets it on a Contacts custom field. This page covers configuring each action and using its results in later steps of the same rule.
Breaking change: The earlier Create Contact from form action has been removed. Any existing automation rules that used it must be recreated using the new Create Contact action described below.
Prerequisites
-
You can create or edit automation rules in the Jira Space (project admin or Jira admin permission).
-
Togetha Contacts is installed on the site.
-
For the Get Contact field values and Set Contact field values actions, the triggering work item has a Contacts custom field that holds the contact you want to read or change.
-
To link one contact to another with Set Contact field values, you also need the other contact's ID, usually from a second Contacts custom field.
Adding an action to a rule
-
Edit or create an automation rule in Project settings then Automation, or in the global automation area.
-
Add a New action component to the rule.
-
Pick the action. Togetha Contacts actions appear in the component list as Create Contact, Get Contact field values, Set Contact field values, and Set Contact from User.
-
Fill in the configuration form that opens, then save the rule.
After you add or change one of these actions, Jira can take up to 20 minutes to show the action's outputs in the smart value picker, because of platform caching. If the outputs don't appear straight away, save the rule and check again later.
Create Contact
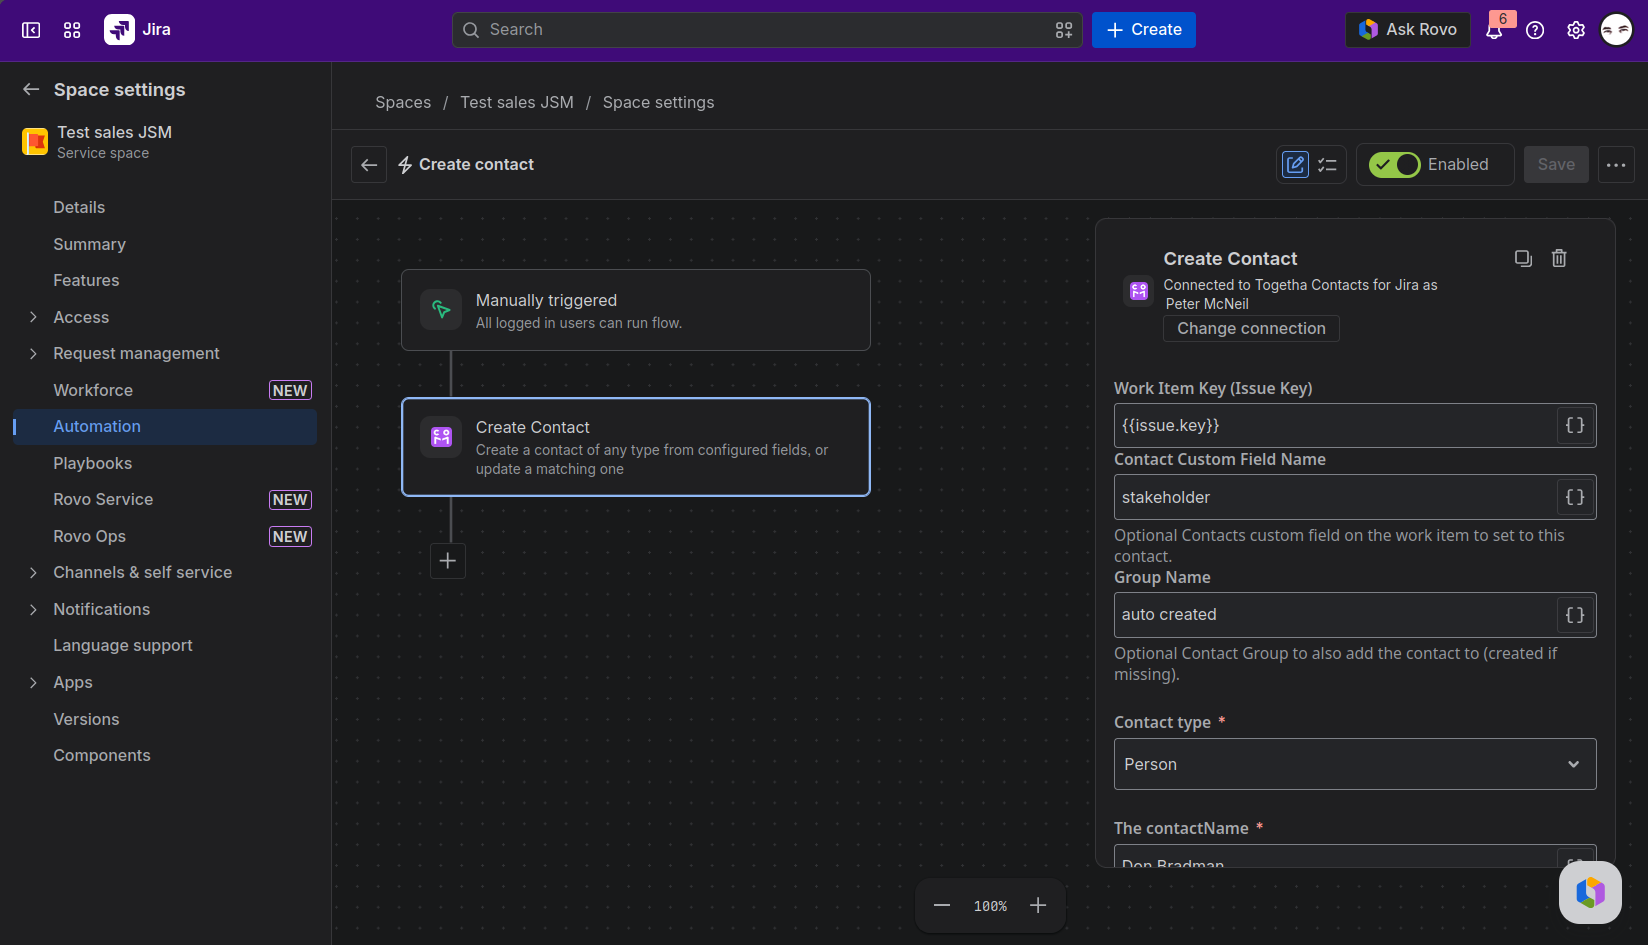
This action creates a contact from values you configure in the rule. It works for any contact type — Person, Organisation, or any type configured in your Contacts app. It can also detect whether a matching contact already exists and update it instead of creating a duplicate, add the contact to a group, and write it to a Contacts custom field on the triggering Jira Work item.
Configure the action
The form is laid out top to bottom in the order below.
1. Link the new contact to a work item (optional)
|
Field |
Description |
|---|---|
|
Work Item Key (Issue Key) |
The Jira Work item key, usually |
|
Contact Custom Field Name |
The name of a Contacts custom field on the Jira Work item. When set, the action writes the new or matched contact into that field on that work item. |
2. Add the contact to a group (optional)
Set Group Name to add the contact to a group. The group is created if it doesn't already exist.
3. Choose the contact type
Select the Contact type, for example Person or Organisation. This tells the form which attributes and relations to offer in the fields below.
4. Set the contact's fields
Add a field for each thing you want to set on the contact, using the Add field button. You must include a Name, which is required and cannot be removed. Beyond Name, each field targets one of:
|
Target |
What it sets |
|---|---|
|
The contact (name and attributes) |
The contact's name and any of its contact attributes. |
|
A related value |
A value reached through a relation, such as a work email, a mobile number, or a postal address. |
|
A relationship to another contact |
A link from this contact to another contact, such as the organisation they work for. |
Every field accepts a smart value, so you can map Jira Work item fields directly into the contact.
For a related value or a relationship to another contact, choose a Mode:
-
Update (the default) changes the first matching value of that type, and creates one if the contact doesn't have it yet.
-
Add always creates a new value.
The Mode only takes effect when the action matches an existing contact (see the next step). When the action creates a new contact, every field is added.
5. Turn on match toggles (optional, for duplicate detection)
The Name, each contact attribute, and each related value has a Match toggle. When you turn on the toggle for a field, that field's value is used to look for an existing contact before creating a new one.
-
What can be toggled: the Name, any contact attribute, and any related value. Relationships (links to other contacts) cannot be used for matching.
-
Match logic: matching is case-insensitive and uses OR logic. A match on any toggled field is enough to find an existing contact. The match is scoped to the chosen contact type.
-
On match: the action updates the found contact with the configured fields, applying each field's Mode, and returns
created: false. -
No match, or no toggles on: a new contact is created and
created: trueis returned.
Outputs
After the action runs, it returns these values as smart values for later steps in the rule:
|
Output |
Description |
|---|---|
|
|
The ID of the created or matched contact. |
|
|
The contact's display name. |
|
|
|
To use an output, select this action's smart value in the picker, then add the output name. For example, a later Add comment step could use a body of Created contact {{...contactName}}, where the leading part is the smart value shown in the picker for this action.
Get Contact field values
This action reads selected values out of a contact and returns them as smart values. You can point it at a contact you already know by its ID, or search for a contact by field values within one of your groups.
Configure the action
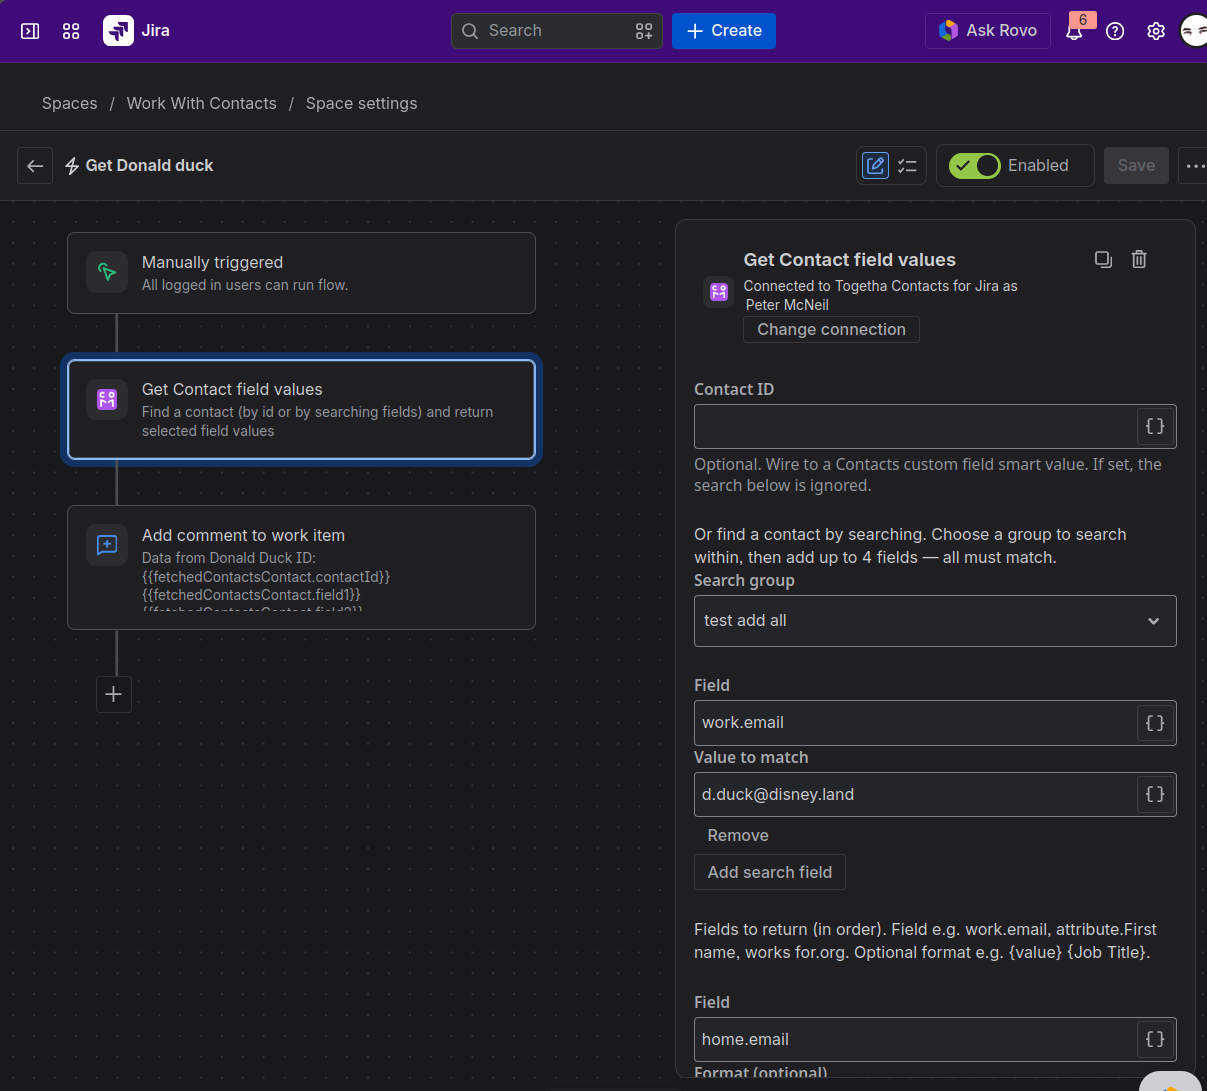
The action resolves a contact in one of two ways. Set Contact ID or use the search fields — not both.
Option 1 — resolve by Contact ID:
-
Set Contact ID to a Contacts custom field smart value that resolves to the contact's ID.
-
Leave the search group and search fields blank.
Option 2 — find a contact by searching:
-
Leave Contact ID blank.
-
Choose a Search group from the picker. The picker lists the groups you can access. Your default group is shown as My Contacts.
-
Add up to 4 search fields using the Add search field button. Each search field has a Field specifier (same grammar as the return fields below) and a Value to match box. All search fields must match — the action uses AND logic.
-
The action returns the first matching contact (the oldest one created).
If no contact matches the search, the action sets found to false and returns empty outputs, rather than stopping the rule with an error.
If Contact ID is set, it is used directly and all search fields are ignored. Only use the search fields when Contact ID is blank.
Both options — configure return fields:
-
Add a row for each value you want to return. Each row has a Field box and an optional Format box. Use the Add field button to add rows.
-
Save the rule. The values come back as outputs
field1tofield8, in the order of your rows.
Naming the field to read or search
The Field box in the return rows and the Field box in the search rows use the same grammar. Matching ignores case on the keywords and relation labels, but spaces within a label matter.
|
Field box |
Matches or returns |
|---|---|
|
|
The contact's name. |
|
|
A contact attribute. Example: |
|
a relation, a dot, then a type |
A related value reached through a relation. Examples: |
|
a relation, a dot, a type, |
An attribute on a related entity. Example: |
A few rules apply:
-
Type relation labels with spaces as they appear. Use
works for, notworksFor. -
orgis accepted as a shorthand for organisation. -
When returning values, if a contact has more than one matching value — for example 2 work emails — the values come back joined with a pipe character.
-
When nothing matches a return row, that row returns an empty value, and the remaining rows keep their positions.
-
Search matching is exact and case-insensitive. Partial matches and wildcards are not supported.
Formatting a return value
Leave the Format box blank to return the raw value. To build a string, type a format. Any text outside braces is kept as is, and each token in braces is replaced.
|
Token |
Replaced with |
|---|---|
|
|
The matched value (for example the email address or phone number). |
|
|
A detail on the relationship, or on the entity, with that name. A |
For example:
|
Field |
Format |
Result |
|---|---|---|
|
|
|
+61 23456789 |
|
|
|
Smith Co Engineer |
|
|
|
27890 |
|
|
(blank) |
peter@nomail.com.au |
Attributes always come back as plain text. A format typed on an attribute. row is ignored.
Outputs
The action returns these smart values for later steps in the rule:
|
Output |
Description |
|---|---|
|
|
Your configured return rows, in order. Rows you didn't fill return empty. |
|
|
The ID of the resolved contact. Empty when no contact was found. |
|
|
|
This action returns at most 8 field outputs. If you configure more than 8 return rows, only the first 8 are returned.
To use a value in a later step, select this action's smart value in the picker and add the output name. For example:
{{fetchedContactsContact.field1}}
{{fetchedContactsContact.field2}}
{{fetchedContactsContact.contactId}}
{{fetchedContactsContact.found}}
Set Contact field values
This action updates an existing contact. It can change the contact's name and attributes, add or update related values such as an email, phone number, or address, and link the contact to another contact. Point it at a contact with a Contacts custom field, choose the contact type, then add a change for each thing you want to set.
Configure the action
-
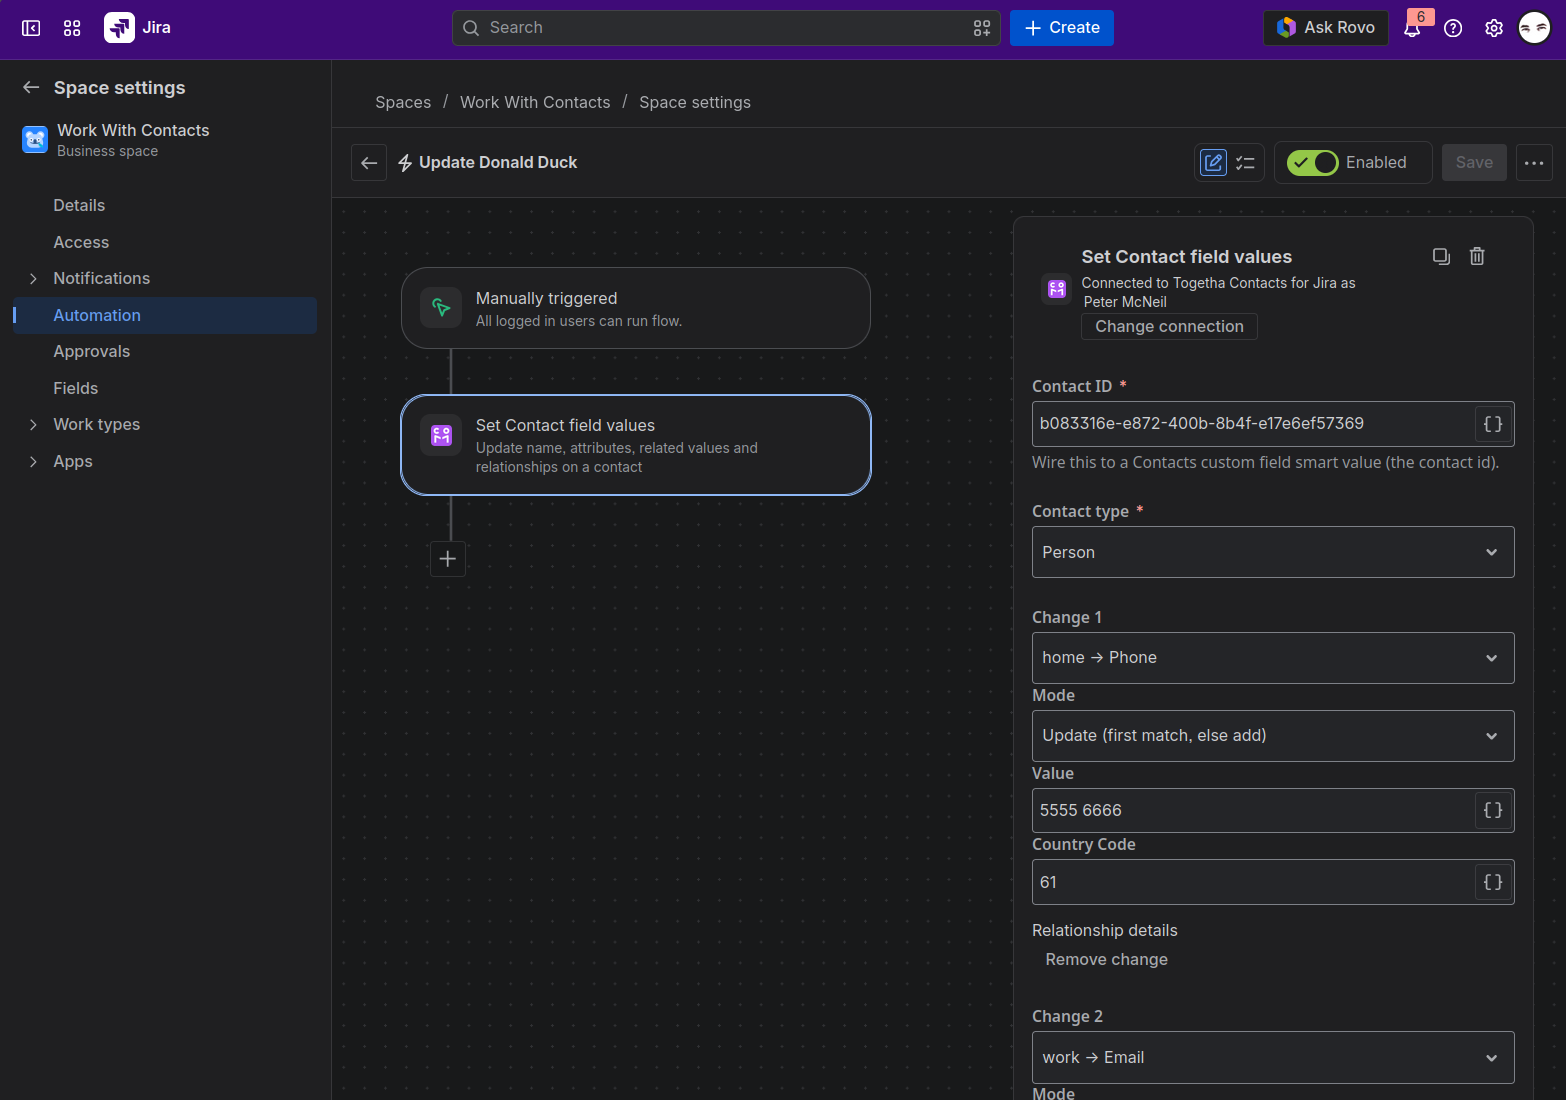
Set Contact ID to a Contacts custom field smart value that resolves to the contact's ID.
-
Choose the Contact type, Person or Organisation. This tells the form which attributes and relations to offer.
-
Add a change for each thing you want to set, using the Add change button. For each change, pick what to set, then fill in the fields that appear.
-
Save the rule.
Choosing what to set
Each change targets one of the following.
|
Target |
What it sets |
|---|---|
|
The contact (name and attributes) |
The contact's name and any of its attributes. |
|
A related value |
A value reached through a relation, such as a work email, a mobile number, or a postal address. |
|
A relationship to another contact |
A link from this contact to another contact, such as the organisation they work for. |
The fields shown for each change depend on the target and the contact type. Attribute and detail fields are labelled with their names, and every field accepts a smart value.
Adding or updating related values
For a related value such as an email or address, choose Add or Update.
-
Update changes the first matching value of that type, and creates one if the contact doesn't have it yet. For example, updating a work email changes the contact's existing work email, or adds one if there isn't a work email.
-
Add always creates a new value.
Fill in the value and any details the type supports, for example the lines and postcode of an address, or a note on a phone number.
Linking to another contact
To set a relationship such as "works for", supply the Related contact ID of the other contact. This is a second Contacts custom field smart value that points at the organisation or person you want to link to. The action does not create the other contact, so it must already exist.
Choose Add to create the link, or Update to change the details on an existing link, such as a job title. As with related values, Update creates the link if it isn't there yet.
Blank values are skipped
A field that resolves to an empty value is left unchanged, so a smart value that comes back empty at run time never wipes existing data. To clear a value, edit the contact in the contact details dialog rather than using this action.
Outputs
After the action runs, it returns these values as smart values for later steps in the rule:
|
Output |
Description |
|---|---|
|
|
The ID of the updated contact. |
|
|
The contact's name after the update. |
|
|
A short summary of what changed, for example |
Set Contact from User
This action finds an existing contact whose source matches a Jira account ID or a JSM organisation ID, or creates one if no match is found, then writes the contact into a Contacts custom field on a work item. Use it to automatically link a reporter, assignee, or JSM customer or organisation to a contact whenever a rule fires.
How it finds or creates the contact
The action accepts two kinds of ID.
-
Jira account ID — a Jira user's account ID, typically from a User-picker custom field smart value such as
{{issue.reporter.accountId}}or{{issue.assignee.accountId}}. The action checks whether a Person contact already has that account ID as its source. If one exists, it is used as-is. If not, the action fetches the Jira user's profile and creates a new Person contact with the same logic as the Jira user import: the display name becomes the contact's name, and the profile URL is stored as a related link. -
JSM organisation ID — a JSM organisation ID from a customer portal field or smart value. The action first looks for a Person contact whose source matches (a JSM customer), then for an Organisation contact whose source matches (a JSM organisation). If a JSM customer exists with that ID, it is used. If not but a JSM organisation exists, that is used. If neither exists, the action creates an Organisation contact using the same logic as the JSM organisation import: the organisation name becomes the contact's name.
Once the contact is found or created, the action writes it to the named Contacts custom field on the work item.
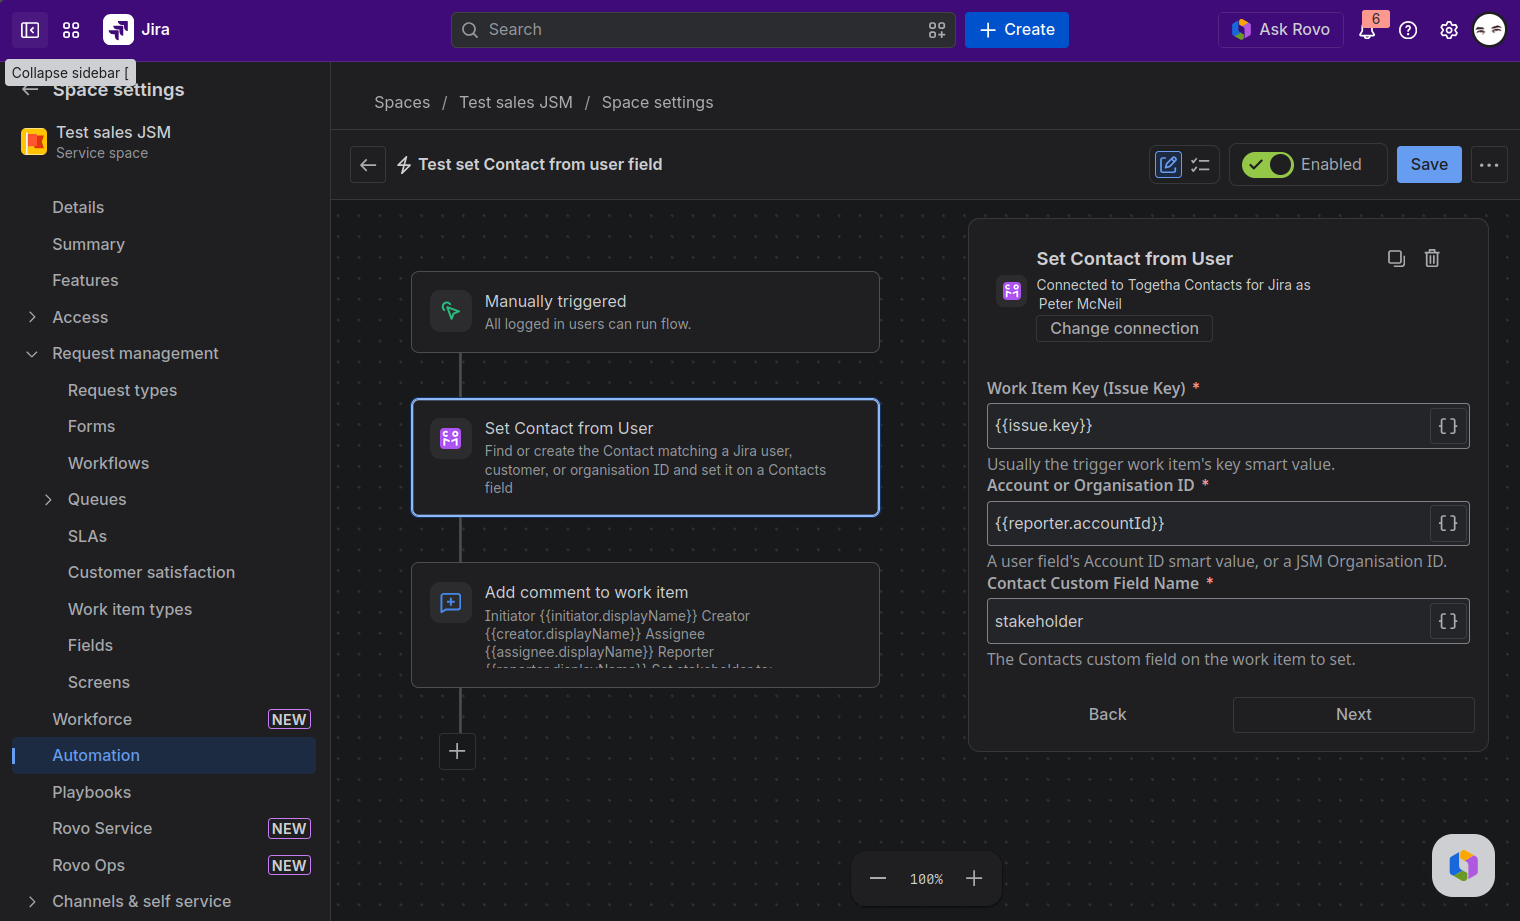
Configure the action
|
Field |
Description |
|---|---|
|
Issue Key |
The key of the work item to update, usually |
|
Account or Organisation ID |
The Jira account ID or JSM organisation ID to look up. Use a smart value such as |
|
Contact Field |
The name of the Contacts custom field on the work item where the found or created contact will be written. |
Outputs
After the action runs, it returns these values as smart values for later steps in the rule:
|
Output |
Description |
|---|---|
|
|
The ID of the found or created contact. |
|
|
The contact's display name. |
|
|
|
To use an output, select this action's smart value in the picker, then add the output name. For example, a later Add comment step could include {{...contactName}}.
Result
Your rule can now create contacts from work item data, read contact values into later steps, update a contact when a work item changes, and automatically find or create a contact from a Jira user or JSM organisation. Common patterns include creating a contact when a work item is raised and writing its ID into a Contacts custom field, reading a contact's email and organisation into a notification, updating a contact's phone number from a form field on the work item, or linking the reporter or assignee to a contact when a work item is created.
Next:
-
Linking contacts to work items: how the Contacts custom field works on a work item.
-
Creating a contact: the manual version of the create flow, with the same fields.